These Tahdig Rice Balls with a Shepherd's Pie Filling offer a unique and delicious twist on the classic recipe. Instead of a mashed potato layer, each bite features an irresistible golden, crispy crust made with rice and potatoes. Served as a main dish, an appetizer, or even a meal on the go, these tahdig balls are pure comfort food.

The Shepard's pie filling comes together in under 30 minutes, blending savory ground meat with tender, flavorful vegetables. Each bite captures the comforting essence of the classic Shepherd's pie, all wrapped in a delicious, golden crust.
Jump to:
- How I Created Tahdig Balls
- Ingredients Needed for Tahdig Rice Balls- Filling
- Ingredients Needed for Tahdig Rice Balls- Rice Layer
- What type of rice is best for making tahdig rice balls?
- How to Make Tahdig Rice Balls with Shepherd's Pie Filling
- My Top Tips for Making Tahdig Rice Balls
- Frequently Asked Questions About Tahdig Rice Balls
- Making Tahdig Rice Balls in Advance
- How to Make Vegetarian or Vegan Tahdig Rice Balls
- How to Store Tahdig Rice Balls with Shepards Pie Filling
- Did You Make the Recipe?
- Tahdig Rice Balls with Shepherd's Pie Filling

This recipe is holds a special place in my heart, as it brings together my Persian heritage and my husband's British roots. In creating this recipe, I aimed to blend two of my favorite dishes, one from each culture. I’m so happy with how delicious they turned out. I hope you like it too!
How I Created Tahdig Balls
My idea for creating tahdig rice balls came about when I had leftover ghormeh sabzi. Despite making a large pot anticipating leftovers, my family wasn't thrilled for a third day of the stew. I didn't want to waste it by throwing it out or just freezing it. So, I got creative and combined two things I absolutely love, crispy tahdig and flavorful Persian stew. I wanted to make something I could easily meal prep and enjoy later. I think the great thing about this recipe is that you can use any leftover stew from your fridge as a filling. My top 3 favorites are ghormeh sabzi, khoreshteh gheimeh, and fesenjoon.
Ingredients Needed for Tahdig Rice Balls- Filling
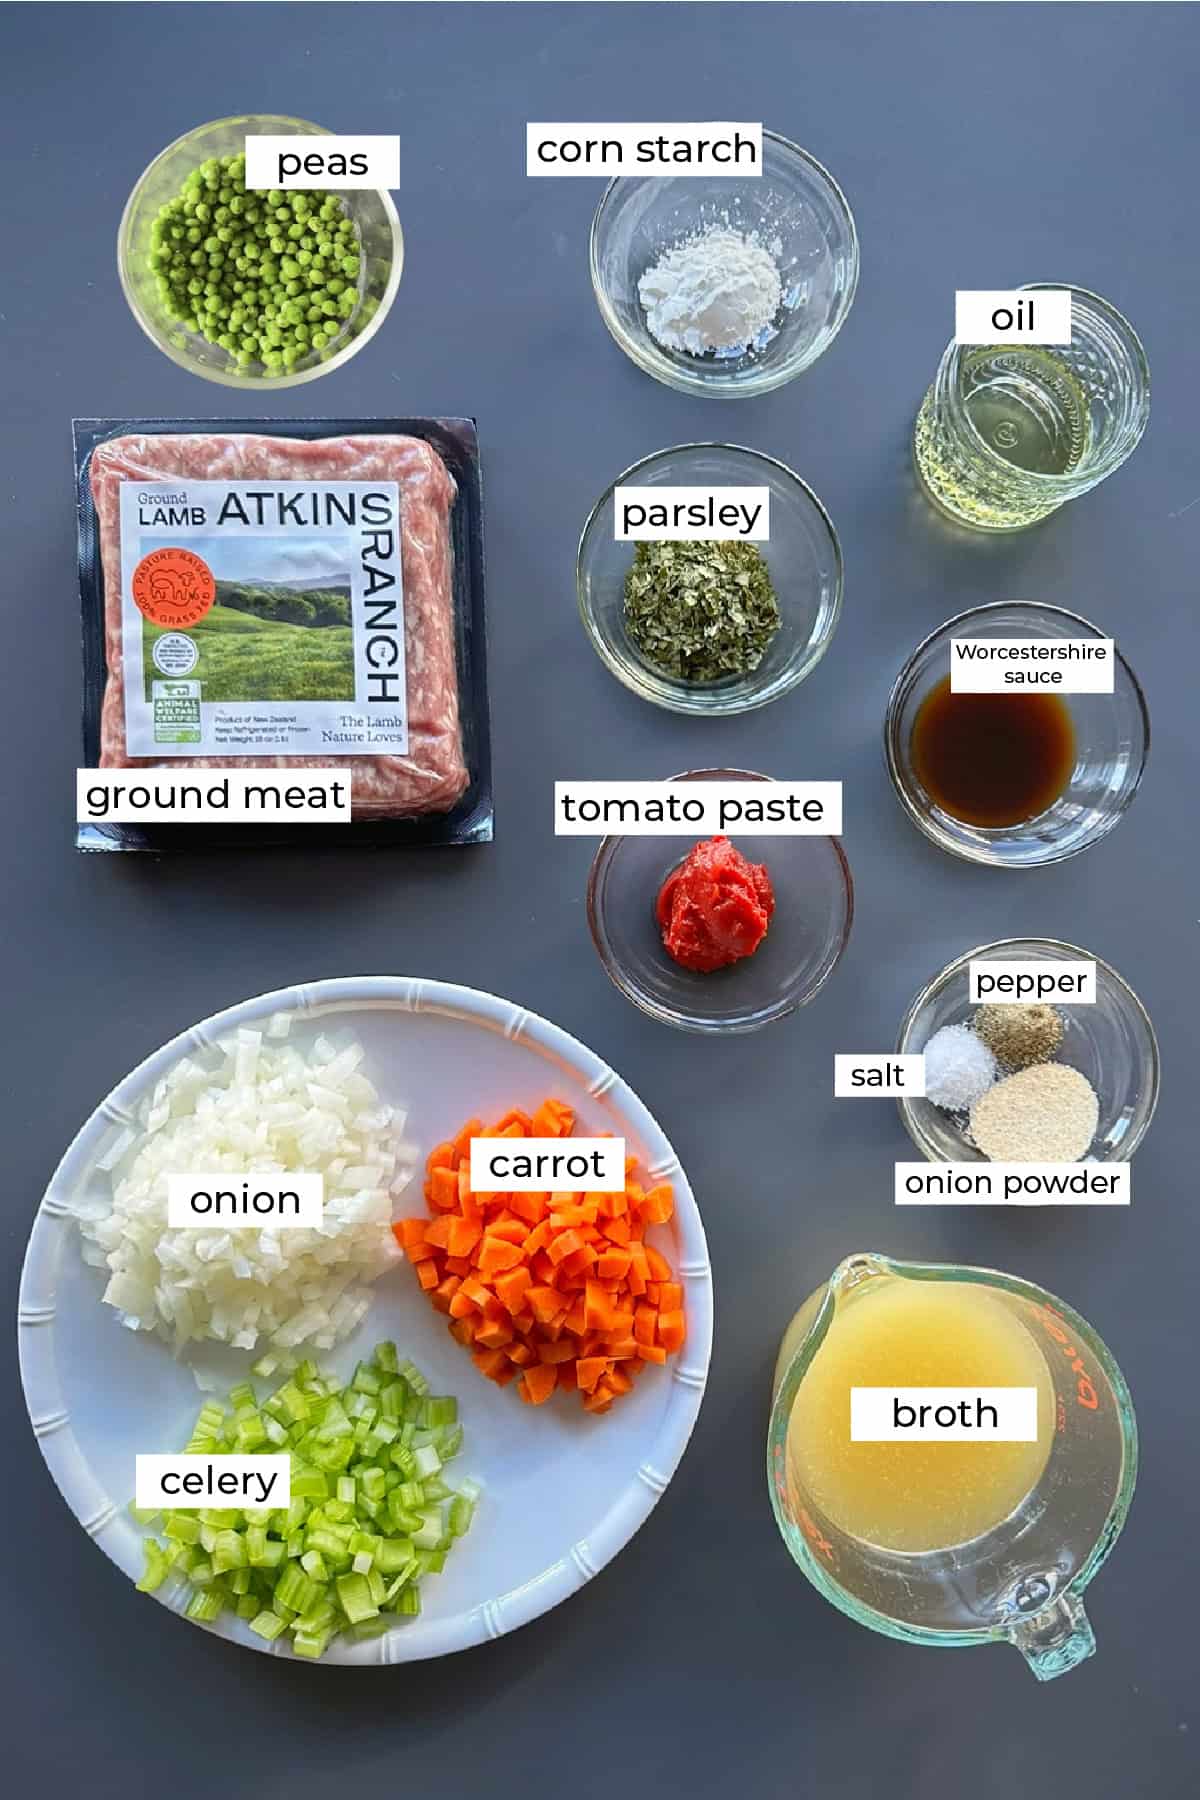
Veggies: onions, carrots, celery, frozen peas
Seasonings: parsley, onion powder, nutmeg(optional), salt, black pepper, Worcestershire sauce, tomato paste
Cornstarch: the cornstarch slurry thickens the sauce, making it easier to use as a filling
Broth: simmering with broth makes the filling taste as if has been cooking for hours (bone, chicken, or beef broth can be used)
Ingredients Needed for Tahdig Rice Balls- Rice Layer

Rice: Japanese rice, sushi rice, or short grain rice (which has higher starch content, making it stickier)
Fat: ghee, butter, avocado oil, or olive oil
Potatoes: I typically use Yukon gold potatoes or russet potatoes. If the potato skin is thick, peel the potato before grating it.
Salt: the rice layer needs to be salted for maximum flavor
View recipe card for ingredient amounts.
What type of rice is best for making tahdig rice balls?
For my tahdig rice balls with Shepherd's pie filling, I recommend using short-grain rice, sushi rice, or Japanese rice. You will want to use a rice with a higher starch content, which means it will be sticky. This ensures the rice balls will hold together perfectly. Basmati rice and other long-grain rice are not sticky, and therefore are not the best choice for making tahdig rice balls.

How to Make Tahdig Rice Balls with Shepherd's Pie Filling
Step 1: Prepare the Ingredients
Vegetables: Dice the onions, carrots and celery.

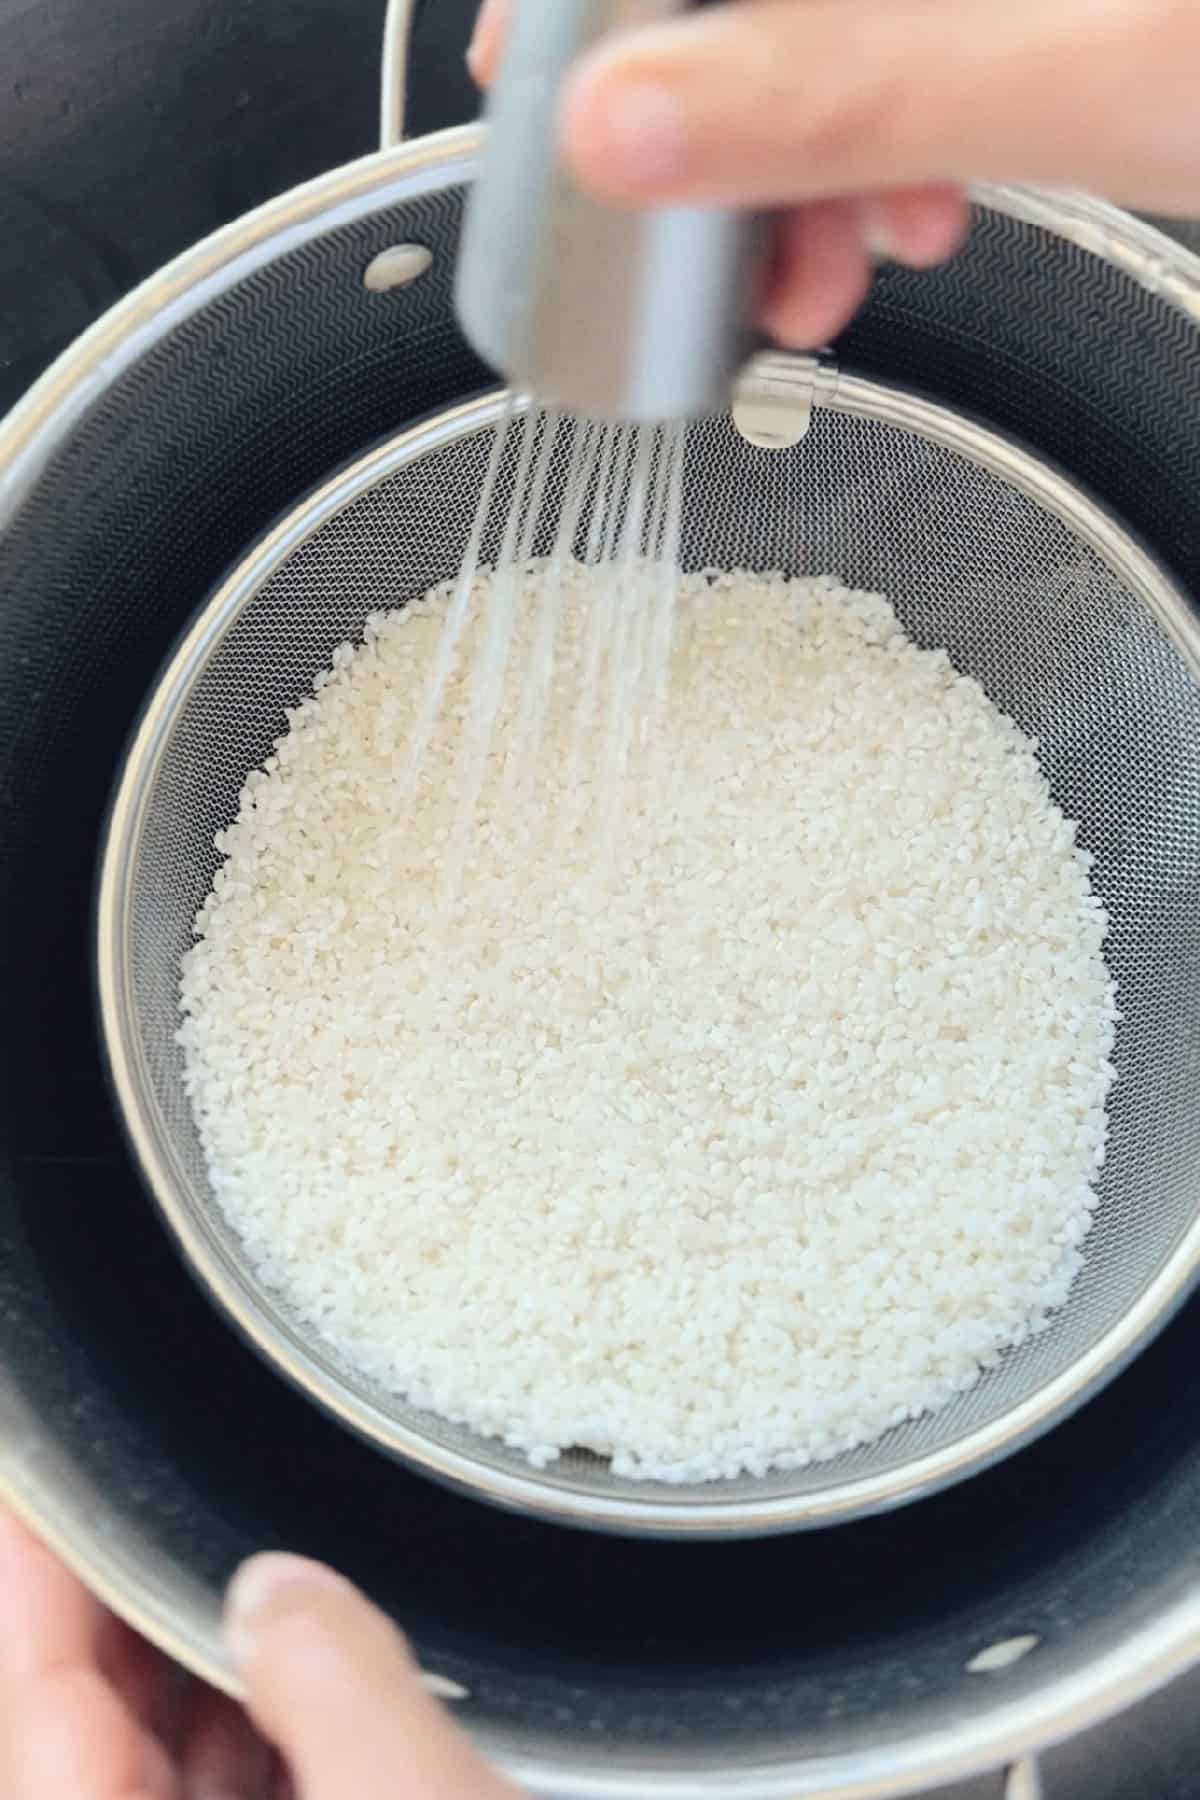
Rice: Rinse until the water runs almost clear.
Potatoes: Grate the potatoes (peeling is optional but recommended when the potato has thick skin).

Step 2: Cook the Rice
Add the rinsed rice to your pot, along with the salt and butter (or oil) and set the heat to high. Once the water comes to a boil, turn the heat down to low, cover, and set your timer for 18 minutes. The bottom of the pot should not form a crispy bottom (tahdig), so please cook the rice on low once it has come to a boil.

Once the rice is cooked, move it off the heat source. Remove the lid, and stir in the grated potatoes.

Step 3: Cook the filling
In a non-stick skillet, sauté the celery, carrot, and onion in just enough oil until they soften. Add the ground lamb (or protein) and brown on medium-high heat for a few minutes.

Add the tomato paste, salt, pepper, onion powder, nutmeg (optional), as well as the soy sauce and dried parsley.

In the same non stick pan, add the peas and the broth, followed by the cornstarch slurry.

Cook over medium high heat until the broth is mostly reduced and just a very small amount of liquid remains.

Step 4: Assemble and Fry
Allow the cooked filing and rice to reach a safe temperature before proceeding.
Using cookie scoops or your hands, scoop ¼ cup of rice mixture, and fill with 1.5 tablespoons of filling. Form into a ball, using water to help the rice not stick to your hands. Try to create an even layer of rice all around the filling. Continue to make rice balls until you have used all of the remaining rice.

Place rice balls in the freezer for at least 30 minutes before air frying and 1 hour before pan frying. This will help the balls hold their shape.

Air fry the balls until a golden crust forms. Alternatively, pan fry in oil until each tahdig rice ball has a golden color. Please refrain from flipping the tahdig balls until a crust has formed on the bottom side.
- Air Fryer: Fry for 20–30 minutes on 400°F until a crunchy rice layer forms on the outside.
- Stovetop: In a non-stick pan over medium heat with oil or melted butter, cook for about 15 minutes until golden and crisp.
My Top Tips for Making Tahdig Rice Balls
RICE: Always use sushi or Japanese short-grain rice. Fluffy varieties like basmati won’t hold their shape and will fall apart.
FILLING: Ensure the filling is fully cooked and any excess moisture has evaporated—a wet filling makes shaping the tahdig balls very difficult.
ASSEMBLING: Set up your workspace with the rice, cooked filling, a bowl of water for dipping your hands (prevents sticking), and a large plate for the assembled tahdig balls. This streamlined setup makes the process faster and smoother.
COOKING: Once the rice balls are in the pan or air fryer, do not move them until a crisp crust forms on the bottom. Moving them too early can cause them to break apart.
Frequently Asked Questions About Tahdig Rice Balls
Tahdig is the crispy layer of rice that forms on the bottom layer of the pot as the rice is cooking. As Persian aromatic rice cooks, the entire bottom layer of rice forms into crispy golden crust, while the top layer remains light and fluffy white rice. Persian crispy rice is one of the more common reasons why people love Persian cuisine.
Yes! In fact, cooking the tahdig balls in a pan with a bit of oil results in the crispiest, most flavorful outer rice layer. The only downside is that it will not remain perfectly circular like it does in an air fryer. Please make sure that you do not move the tahdig balls until each side has formed a curst in the pan, otherwise they will fall apart.
I typically use freshly cooked rice for tahdig rice balls, but if you have a surplus of leftover short-grain rice, it's definitely a viable option. To ensure the rice is soft and ready for shaping, I recommend adding a few tablespoons of water to it and reheating it first. Once it's heated through, you can mix in the grated potato and proceed with the recipe.
To prevent the tahdig rice balls from falling apart, make sure to dip your hands in water to help shape them. You will want to close up any gaps, which will create a firmer structure. Additionally, placing the shaped rice balls in the freezer for at least 30 minutes will help them hold together better during cooking.
If your tahdig rice ball is not crispy, it probably hasn’t cooked long enough. In the air fryer, I set the temperature to 400°F and cook for 20 minutes. After that, I flip the rice balls around and cook for an additional 5-15 minutes, depending on how much browning has occurred. In a pan, I fry the first side for at least 5 minutes or until fully golden before flipping to the other sides to ensure a perfectly crispy texture and golden brown color all around.

Making Tahdig Rice Balls in Advance
Tahdig rice balls can be made up to 3 months in advance. They should be properly stored in the freezer and can be taken straight from the freezer to the air fryer or skillet to fry. I recommend wrapping them in plastic wrap and then placing in an airtight container or ziploc bag.
How to Make Vegetarian or Vegan Tahdig Rice Balls
You can easily make this recipe for tahdig rice balls vegetarian by substituting the ground meat with plant-based alternatives like crumbled tofu or chopped mushrooms. For the broth, opt for a vegetarian version or use water. To keep it vegan friendly, replace Worcestershire sauce with tamari or soy sauce, and swap the butter for avocado or olive oil.
How to Store Tahdig Rice Balls with Shepards Pie Filling
Uncooked tahdig rice balls should be placed in the freezer. I recommend wrapping 1, 2, or 3 rice balls in plastic wrap, then placing them in a freezer safe bag. They cook directly from the freezer, whether you’re using a pan or air fryer. No need to defrost!
Did You Make the Recipe?
I would love to hear your feedback! Please leave a comment and star rating below. You can also pin my recipe on Pinterest or share your creation on Instagram by tagging me @mulberryblvd. Thank you! Tannaz

Tahdig Rice Balls with Shepherd's Pie Filling
Ingredients
Meat filling
- 2-3 tablespoon oil
- ½ cup celery finely diced
- ½ cup carrot finely diced
- ½ cup onion finely diced
- 1 lb ground lamb or ground meat of your choice
- 2 tablespoon tomato paste
- ½ teaspoon salt or more to taste
- ½ teaspoon pepper or more to taste
- ½ teaspoon onion powder
- 1 tablespoon parsley
- ½ teaspoon nutmeg optional
- 2 tablespoon Worcestershire sauce
- ½ cup fresh or frozen peas
- ⅔ cup broth bone, vegetable or chicken broth
- ½ tablespoon cornstarch mixed with 2 tablespoon cold water
Rice Layer
- 2 cups rice Japanese, short grain, or sushi
- 3.5 cups water
- 3 tablespoon butter or ghee (or if needed, replace with oil)
- 3 teaspoon salt
- 1 ½ cups raw grated potato
Instructions
Preparing the Ingredients: Rice and Potato Layer
- Rinse the rice under cold running water in a sieve. Continue rinsing until the water runs almost clear (this usually takes a few minutes).
- Drain the rice and transfer to a medium pot with a lid. Add the water, butter or oil, and salt. Bring the water to a rapid boil over high heat. Immediately reduce the heat to the lowest setting, cover the saucepan tightly, and simmer for 18 minutes or until the rice has cooked and the water has evaporated.
- Once the rice has cooked, remove the pot from the heat. Taste the rice and adjust the salt if needed.
- Grate the raw potatoes and stir it into the rice until evenly distributed. Set aside.
Preparing the Ingredients: Shepard's Pie Filling
- Finley dice the onion, carrots, and celery.
- Heat 1-2 tablespoons of cooking oil in a large skillet and add the vegetables in. Sauté over medium heat until they are softened (about 5-7 minutes).
- Add the ground meat to the skillet, using a spoon or spatula to break it apart into smaller pieces. (Optional- drain off any excess grease.)
- Stir in 1-2 tablespoons of tomato paste. Cook for 1 minute, stirring constantly, to deepen the flavor. Add the salt, pepper, onion powder, nutmeg (optional) parsley, and Worcestershire sauce. Stir together for a few minutes or until the meat is fully cooked.
- Add the frozen peas and bone broth, followed by the cornstarch slurry. (Cornstarch slurry is ½ tablespoon cornstarch and 2 tbs cold water stirred together.) Simmer uncovered on medium high heat until until the sauce has thickened and most of the liquid has evaporated. Stir occasionally to prevent the bottom from sticking.
Assembly
- Prepare your workspace by setting out the rice mixture, the cooked filling, and a small bowl of water.
- Shape the tahdig balls: Using your hands or a cookie scoop, take about ¼ cup of the rice mixture using. Flatten the rice slightly, press a hole in the middle, and spoon in about 1 to 1.5 Tbs. of shepherd’s pie filling in the middle. Cover the filling with a thin layer of rice and gently shape it into a ball as you close the gaps. Dip your hands in water while shaping. This will prevent the rice sticking to your hands and will help seal the rice.
- Freeze to set: Place the assembled tahdig balls on a tray and freeze for at least 30 minutes before cooking. Wrap any extra balls in plastic wrap, then place them in an airtight container or freezer bag for up to 3 months.
Cooking
- Tahdig rice balls can be cooked in either an air fryer or on the stovetop. The air fryer does take a longer tine, but it is mostly hands off once they go in.
Air Fryer Method
- Place the tahdig balls in a single layer, leaving space between them. Air fry at 400 degrees for 20 minutes. Flip the tahdig balls and add another 5-15 minutes or until they are golden and crispy. Please do not move them until after the first 20 minutes of cooking.
Stovetop Method
- Add a few tablespoons of oil to coat the bottom of a nonstick pan. Place the tahdig balls in the pan and cook on medium heat for 5 minutes before flipping them. Once a crust has formed, then rotate the balls until they are golden brown and crisp on all sides.